by John Correll
To Email
Home Page
This
article contains many photos. You might experience a short delay while they
all download.
If not all the photos load up (that is, you get boxes with a little red X
in it), try clicking your refresh button, or pressing the F5 key.
NOTE ON INSTALLATION OF LIFTABLE FLOORBOARD OR CASTING DECK BOARD: Occasionally a visitor to this web page contacts me asking for drawings or photos of the liftable floorboards and bow casting deck installation on the boat. Unfortunately, I don't have drawings or photos. So I decided to write up an explanation of how to install a simple liftable floorboard or casting deck board on a basic aluminum boat. This explanation comes in a PDF document. So you can easily print it out for your personal reference. To bring up the document, click here.
LINK TO A FISHING STORY: If you'd like to read a short photo-illustrated story of four senior guys fishing on Lake St. Clair on a day in May (2015), click here. (Note: the boat shown in the story is not the boat depicted in this Boat Conversion article.)
The
article on this boat conversion comes in three parts.
Part 1 describes the initial conversion. This is the original article, first published in October 2007.
Part 2, published May 2009, lists eight of the most common questions and comments that have arisen since publishing the original article in 2007 … and my answer to each.
Part 3, published May 2009, describes subsequent enhancements to the initial boat conversion.
FIG. 1 — BEFORE: 3/2006 FIG. 2 — AFTER: 6/2006
How
It Started
For nearly a dozen years I'd been mentally constructing
my ideal walleye boat. Whenever I was fishing I'd make mental note of what I liked
and disliked about the boat I was in. Whenever I saw a new boat I'd study it to
discover things to include in my imagined boat.
And while doing this I scoured boat shows and magazines — looking for the real boat that exactly matched my dream boat. But I never found it. Every rig — no matter how loaded — lacked certain features that I wanted. And, worse yet, included things that I didn't want.
Plus, the really nice boats became ridiculously priced. In 1990 one could buy a great walleye rig for about $12,000. Now, it takes $35,000 … and more.
Then, one day in January 2006, a radical concept flashed through my brain. The concept was: Buy a "basic shell" of a boat — that is, a bare-bones utility boat — then transform this basic boat into the walleye rig of my dreams.
What I ended up purchasing was a Lund SSV-18 — a basic riveted-aluminum utility boat (FIG. 1). I then transformed it into exactly what I wanted — my ideal walleye boat (FIG. 2).
Here's how it happened.
Guiding
Objectives
Before buying the basic boat I defined what I wanted
to accomplish with it. In doing this I decided that I wanted this boat to be (1)
storable at home, (2) easy to tow, (3) launchable at shallow-water boat launches,
(4) easy to maintain, (5) affordably priced and, most important (6) adaptable
into a highly productive walleye-pike-bass fishing rig. To achieve the last objective
the boat had to be able to accommodate up to four persons in centerline
seating and afford decent, comfortable fishing for each. The challenge before
me was to find a basic boat that satisfied all six objectives.
Basic
Boat Features
I then defined the characteristics that this
boat must have in order to achieve my guiding objectives. What emerged is the
following features list.
Length: 18 to 19 feet. REASONS FOR THIS LENGTH: (a) To enable fishing up to four persons comfortably (with centerline seating). (b) To enable it to be stored behind my house. (I've stored a boat in a storage yard before. Too many inconveniences.)
Beam: Under seven feet. REASON: To allow for a narrow trailer which, in turn, makes for easy towing and turning; less worrying about trailer wheels running "out-of-lane." (In the past 15 years walleye boats have gotten wider and wider, up to a ridiculous eight and a half foot beam. What I wanted was just the opposite: a streamlined boat.)
Weight: Relatively light. REASONS: (a) To enable the boat to reach reasonably fast speeds with a fairly small motor. (b) To enable easy towing with a medium-size tow vehicle. (c) To enable launching at shallow-water boat launches. I wanted my total rig — trailer, boat, motor, equipment — to be under 2000 pounds.
Hull Configuration: Shallow-V, no more than about six degrees deadrise. REASON: To have a boat that will float in about six inches of water (with the outboard in up position). The purpose of this is to enable the boat to be launched at shallow-water launches, like those found on smaller lakes and more-remote waters.
Hull Material: Aluminum. REASONS: (a) To avoid worrying about scratching fiberglass on the rocks of the Canadian shield (some of my favorite fishing waters). (b) To make for easy maintenance. (c) To provide relatively light weight for easy towing with a medium-size tow vehicle and for launching at shallow-water launches. (d) To enable easy do-it-yourself customizing (an essential).
Mode of Steering: Tiller. REASONS: (a) To enable more-precise boat control, especially in rapids. (b) To provide maximum unimpeded fishable space in the boat – so it could take up to four persons and still provide a good fishing experience for each. (Note: I'd concluded that remote, or steering wheel, steering is great when making a long, full-speed run. But I spend less than five percent of my time doing long runs. The remaining 95 percent I spend fishing. And, for this, a tiller is tops — in my opinion. It provides maximum fishing ease, versatility, and space. To the point, a properly-configured 18-foot tiller boat provides the same amount of "fishing space" as a 22-foot remote steering console boat.)
Type of Gas Tank: Remote — meaning, above-floor. REASON: To allow for centerline seat placement along the entire length of the boat. (Note: an integrated tank is usually located under a floorboard along the centerline of the boat. This, in turn, prevents optimal centerline seat placement in that section).
Bow Configuration: Has a board at the bow tip. REASON: To enable easy installation of a bow-mount trolling motor.
Person & Gear Capacity: At least 1200 pounds. REASON: To enable the boat to safely carry up to four persons and gear.
Basic
Boat Evaluation Process
Over the years I'd amassed a small
library of boat catalogs. With the above feature list in mind I began looking
through them to pick out the most suitable boat. I made a list of "contenders
for consideration." It included the Crestliner Canadian 18, Princecraft Hudson,
Lund Alaskan 18, and Lund SSV-18. I then visited dealers to closely examine each
one. This included snapping digital photos, taking key measurements, and peering
into all compartments. (Yes, the camera caused some head-scratching by boat salesmen.
One remarked, "You're the first I've seen to go boat shopping with a camera.")
In the end I concluded that the Lund SSV-18 best met my objectives and desired
features. I then checked several dealers for price. It ranged from $4500 to $3999,
pre-tax (January 2006).
NOTE: Lund updated the SSV-18 in 2006. It included several modifications that make the boat a bit more fishering-friendly than the pre-2006 boat.
Finished
Boat Features
While searching for the basic boat I crystallized
in my mind what I wanted the “finished product” to be like. This resulted
in a list of dream features. I used this list to guide the design and customizing
process. Here's what I wanted for my finished boat … and why.
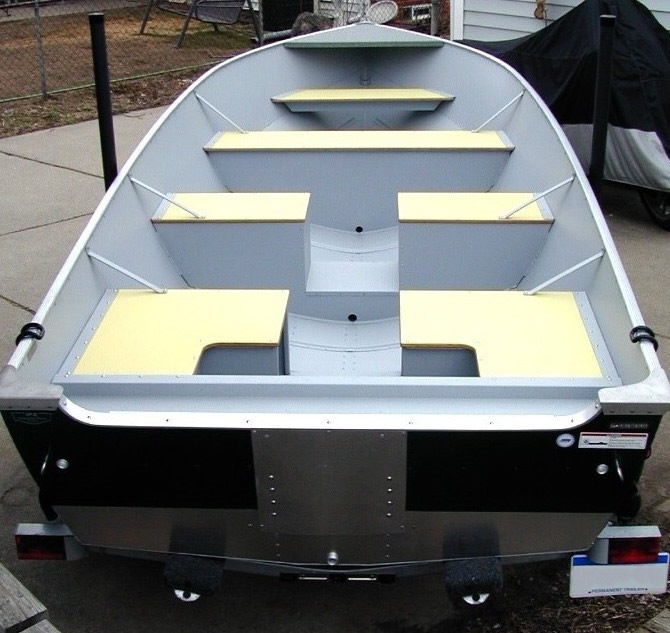
Centerline Seating the Entire Length of the Boat. This was my #1 priority. My biggest gripe about many walleye boats is that they have only one or, at most, two centerline positioned seats. The rest are "off-center seats." I hate off-center seating for three reasons. First, it makes for a listing boat. Second, a person seated in an off-center seat can't pivot 360 degrees. Or, can't comfortably fish either side of the boat. Third, off-center seating often results in left-and-right side-by-side seats. This arrangement makes it hard for a boatload of three or four fishermen to "work a shoreline" together (my favorite fishing style). This is because left-and-right side-by-side seating puts one person behind another person when fishing a shoreline. MY SOLUTION: I installed six seat bases along the centerline of the boat (FIG. 3).
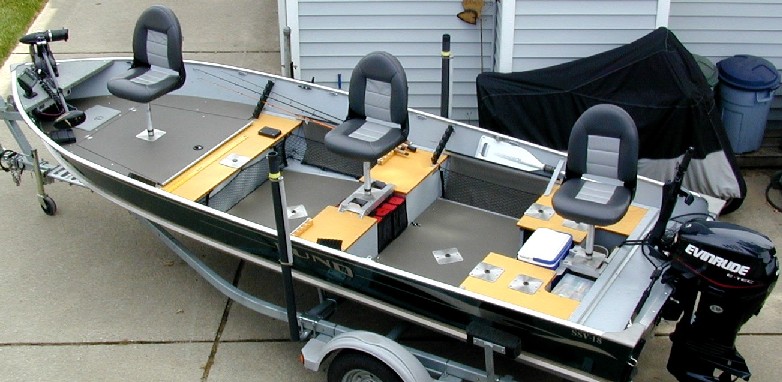
FIG. 3
— Total 10 Seat Bases — Six of Them Centerline Bases
(also shown are three elevated seats in "fishing position" —
and, no, regardless of how it looks, this doesn't result in a "tippy boat")
Elevated Seats Front, Middle, and Rear. Elevated seating makes for an improved fishing experience. However, most walleye boats have only one elevated seat. It's located on the front bow deck. This is the seat used by the trolling motor operator. Everyone else in the boat is relegated to regular seating — that is, to a pedestal seat sitting on the lower floor. This isn't good. MY SOLUTION: I installed a second elevated seat base on the front bow. Plus, I installed elevated seats in the middle and rear, as well. This enables three, and even four, guys to fish from an elevated seat. FIG. 3 shows three elevated seats — front, middle, and rear. (Note: for safety reasons a person shouldn't ride in elevated seating above 5 mph. So, for traveling fast, passengers in my boat pull out the pedestal and drop the seat into a lower-level seat base. This takes only seconds. Or, if we're only going a short distance, they leave the elevated seats in place and just sit on a bench seat for a couple minutes or so.)
Multiple Seat Arrangement Options; Speedy Seat Repositioning. Another gripe I have is that (a) seat arrangement options in most boats are limited and (b) seat repositioning tends to be hard to do. So I decided to do two things. First, provide enough seat bases to allow for multiple seat arrangement options. Second, use "quick-change" seat hardware. MY SOLUTIONS: To create multiple seat arrangement options I installed 10 seat bases (FIG. 3). For quick repositioning I went with non-threaded kingpin style seat bases and pedestals (FIG. 3B). This allows a person to easily reposition a seat in seconds … to any of several locations throughout the boat.
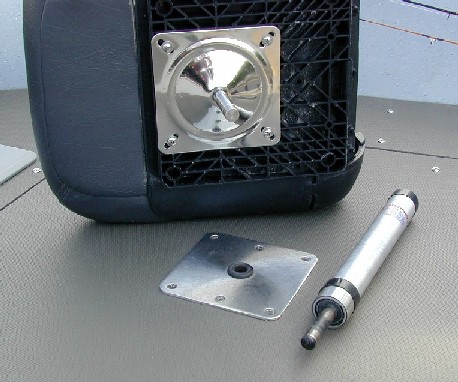
FIG. 3B
— Non-threaded Kingpin-style Seating Allows for Quick, Easy Seat Repositioning
-
(SHOWN: 7"x7" stainless steel seat base – 13" aluminum pedestal
– stainless steel seat mount without spring)
Capability to Fish Four Persons Comfortably. Many guys fish with just one other person. But I fish with my brothers. And I have five of them. So a typical outing can have three or four persons in the boat. In my research I discovered that the seating arrangement in many walleye boats is great if you have just two fishermen. But it's awful when you go to three or four. Even some of the biggest, most expensive boats are this way. It's not that these boats lack seat bases to hold four persons. Rather, the problem is that when four persons are actually seated in the boat, two of the guys are seated in lousy fishing positions. That is, they're seated off-center. Or, they're seated so close together that they're crowding one another. MY SOLUTION: I positioned the seat bases such that four persons could sit on the centerline of the boat with no less than 42 inches between pedestals.
Huge Storage Capacity. One of my pet peeves while fishing is tripping over gear whenever I stand or move … and also not having a place to put my feet while sitting. So, maximum storage capacity is a high priority with me. I wanted enough storage to be able to "clear the deck" of gear … even with four persons fishing. MY SOLUTION: I did three things to maximize storage.
FIRST, I converted the front six feet of the boat into a cavernous under-deck bow storage compartment by installing a bow deck (FIG. 4). This compartment consists of two areas: (1) a small triangular area at the front and (2) a huge rearward main area. The front area is accessed via a watertight hatch cover in the floor. It's the dry storage. The main area is accessed by opening a 3-foot wide x 3-foot long section of the deck (see below).
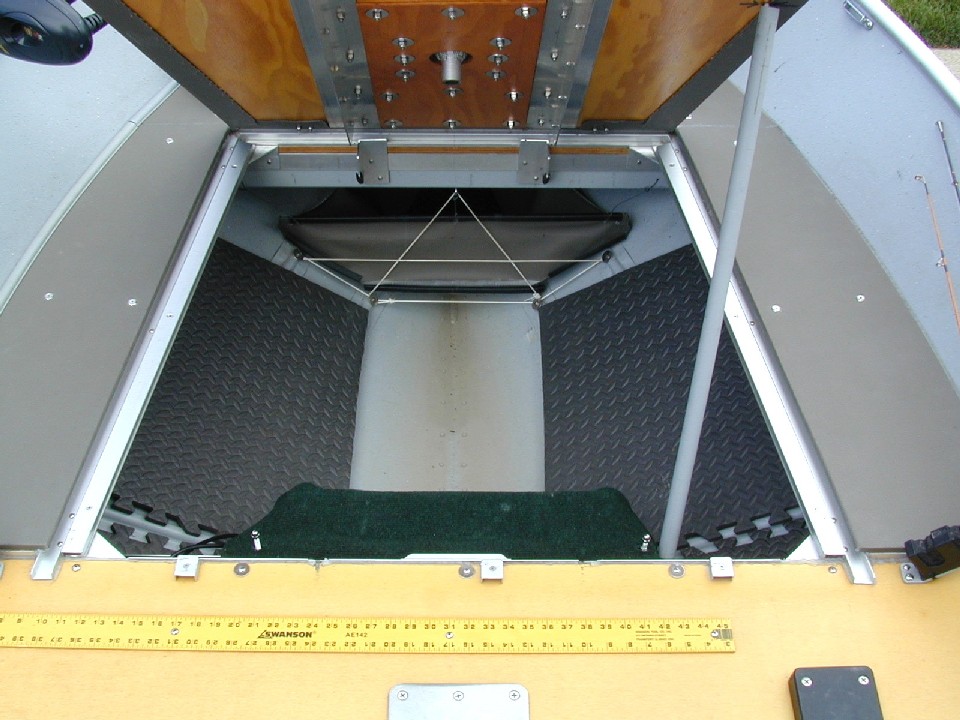
FIG.
4 — Under-deck
Bow Storage Compartment -
(under the piece of green carpet are one starting battery and two trolling motor
batteries — a large plastic tub with lid sits in the center of this compartment,
and a plastic tray sits on top of that, shown in FIG. 7 - such tubs are found
in Wal-mart, Lowes, etc.)
SECOND, I installed a hinged floorboard in each of the middle and rear sections of the boat (FIGS. 5, 5B). Each floor lifts to expose an under-floor storage area of about 48 inches x 36 inches x 5 inches deep (on average). These compartments mainly hold items that see little use.
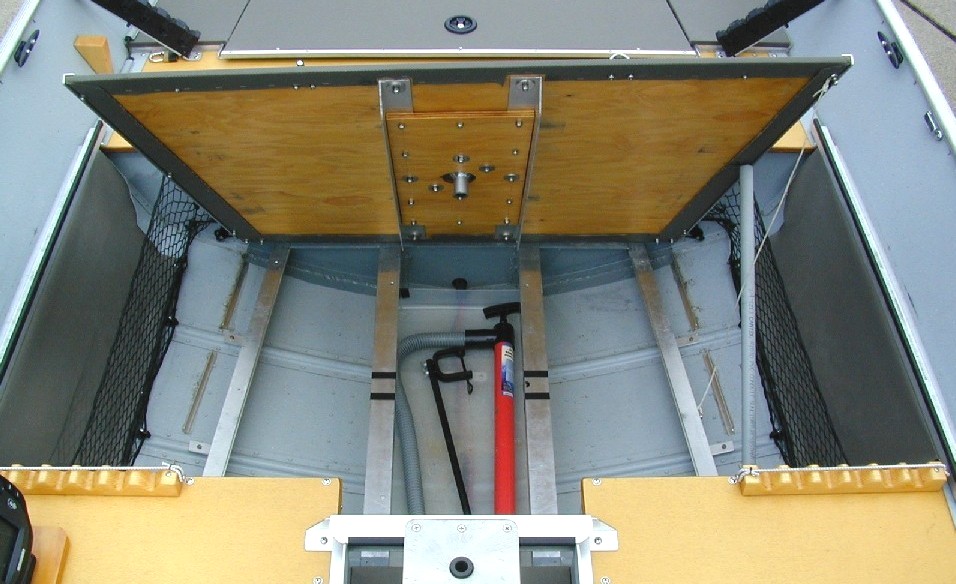
FIG.
5 — Under-floor
Storage Compartment — Middle Section - (this
compartment is relatively empty in the photo)
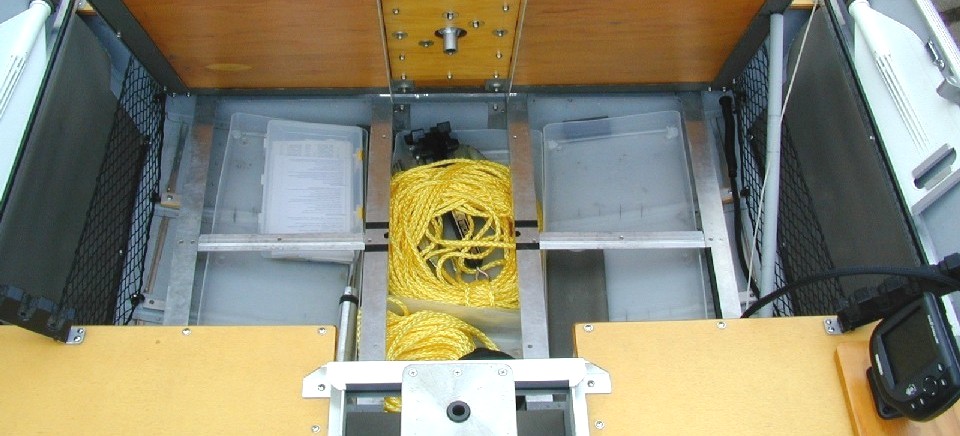
FIG. 5B
— Under-floor Storage Compartment — Rear Section
THIRD, I installed storage netting around the perimeter of the middle and rear sections. Each net forms a storage "compartment" between the net and the side of the boat (FIG. 6). This "compartment" holds ample gear and clothing articles for instant access. There are a total of four of these storage compartments in the boat (two each side). Each includes a vinyl rain flap that can be positioned over the contents during rain.
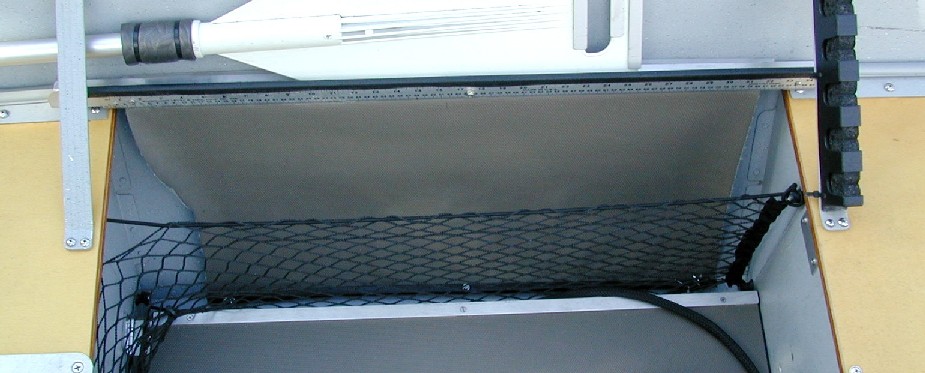
FIG.
6 — Net-created
Side Storage Compartment (with vinyl rain flap)
In total, the storage capacity of the boat is huge for its size (FIG. 7). This, in turn, enables four guys to fish and still have ample open floor space for standing and moving.
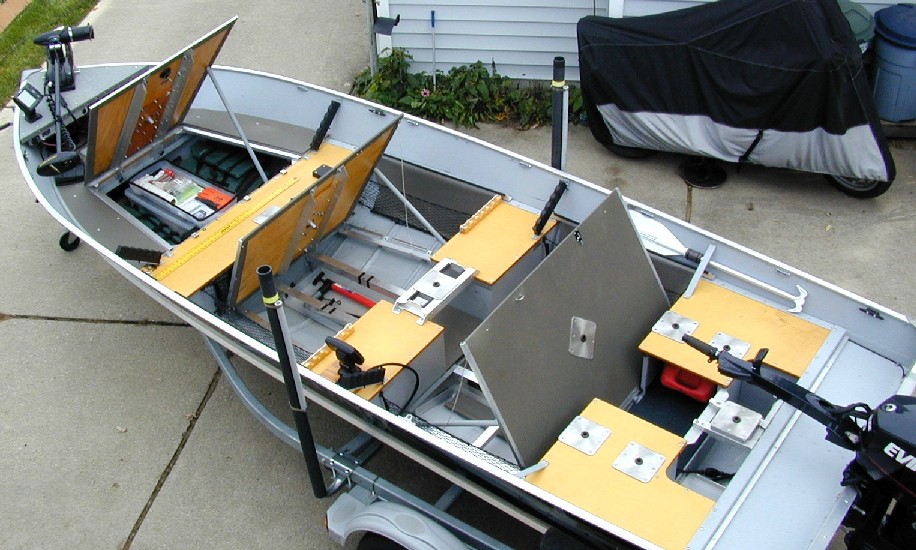
FIG. 7
— Three Large Under-floor Storage Compartments
Dry Storage Compartment. In addition to large storage capacity it's nice to have a bit of dry storage, as well. MY SOLUTION: I configured the front area of the bow storage compartment into dry storage (FIG. 8). This was done by using a piece of sheet vinyl (same material as used for the flooring). The vinyl was formed into a leak-proof basket that has the contour of the front compartment. Thus, anything stored in this leak-proof basket in the front compartment is separated from any water elsewhere in the boat. The entrance to this compartment is a plastic water-resistant hatch in the floor above.
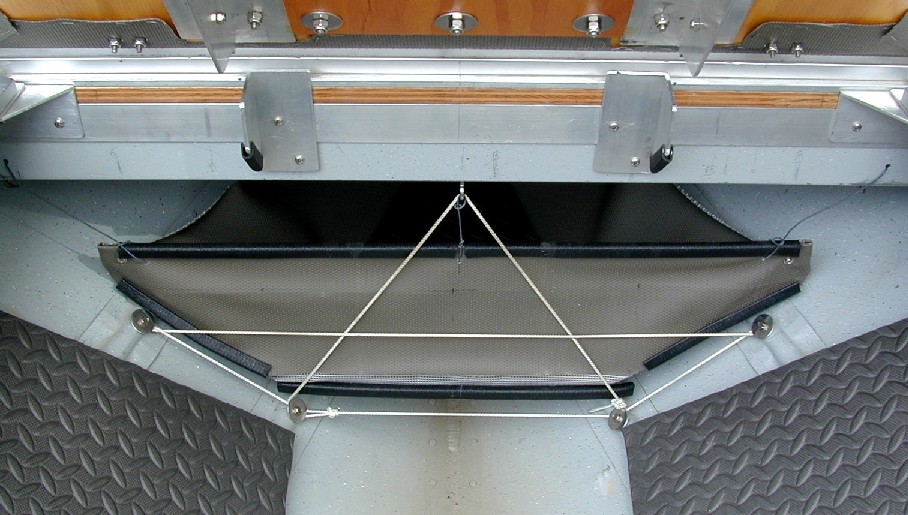
FIG.
8 — Dry Storage
"Basket" at Bow Point -
(basket made of floor vinyl — a watertight floor hatch is above, not shown
in photo)
Battery Storage in the Front. In my opinion many walleye boats today are too "rear heavy" (or, conversely, too "front light"). The result is that the boat (a) takes longer to get up on plane, (b) sits low in the water at the transom, which makes the boat more prone to over-the-transom waves while backtrolling, (c) undergoes excessive front-end wave pounding at high speed, and (d) sits non-level in the water while fishing. This last condition is especially irksome. It results in passengers sitting on an angled, or tilted, seat all day. MY SOLUTION: Position the batteries up front. I equipped this boat with one starting and two trolling motor batteries. They total 148 pounds. I installed this 148 pound load in the front bow storage compartment (FIGS. 4 and 9). This results in a level-sitting boat while fishing, and one that cuts through wave chop at top speed with amazing smoothness.
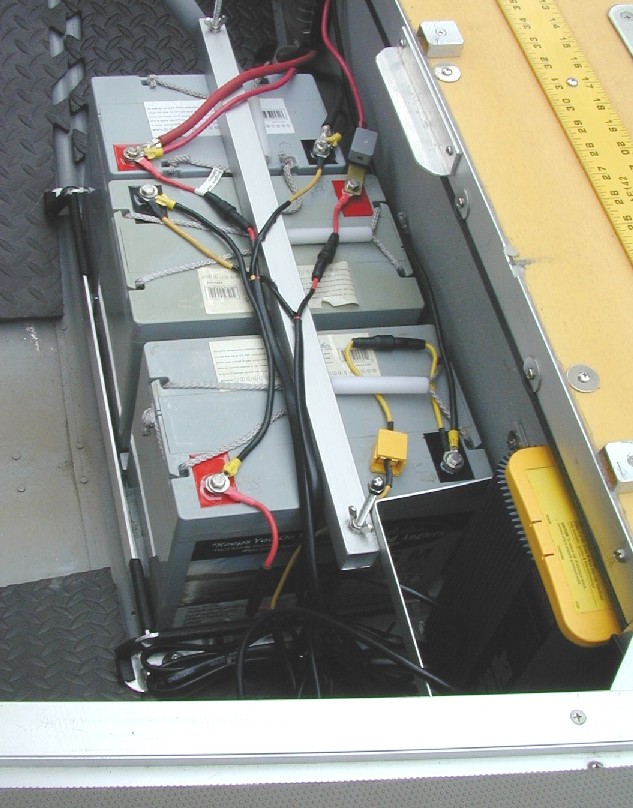
FIG.
9 — Three
Batteries and Charger (lower right) in Front Storage Compartment - (normally
the batteries are covered with a piece of carpet or a foam pad, as shown in FIG.
4)
Bow-mount 24 volt Auto-pilot Trolling Motor. Many walleye boats are rigged with transom-mount trolling motors. The reason, of course, is to facilitate backtrolling. However, in the type of fishing I mainly do (bass and pike casting), a bow-mount motor works out better. Also, auto-pilot is a helpful feature. Further, I use my trolling motor extensively — that is, all day long. So I decided to go with 24 volt (versus 12 volt) for longer battery run-time. MY SOLUTION: I installed a 24 volt Minn Kota Powerdrive 70PD/AP. It's rated at 70 pounds thrust. Due to the SSV-18's light weight, it propels the boat with ease. Which enables easy boat control in any wind and water condition.
Dual Sonars. I've found that the people I fish with like to stay informed on water depth and "what's down there." When there's only one sonar in a boat it forces guys to keep asking "what's the depth." Or, to keep turning around to look at the sonar at the opposite end of the boat. MY SOLUTION: I installed dual sonars – one front, one rear. To prevent interference between the sonars I purchased units having different kilohertz frequencies. The front unit is a Humminbird 727. It operates at 83 and 200 kilohertz. The rear unit is a Humminbird Matrix 47 3D. It operates at 83 and 455 kilohertz. To eliminate interference between the units, I set the "Beam Select" on the 727 unit to 200 kHz only and the "Beam Select" on the Matrix 47 unit to 445 kHz only. I get zero interference between the sonars. The rear transducer for the front sonar and the transducer for the rear sonar are mounted on opposite corners of the transom, shown below (FIG. 9B).
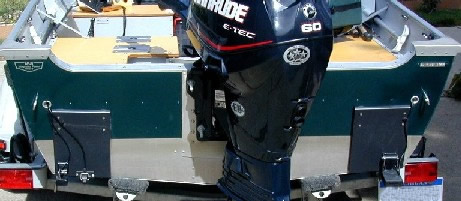
FIG. 9B
— The Transom Sports Dual Mounting Boards to Hold Multiple Transducers and
Other Devices
Dual Transducers for Front Sonar. While fishing, the person who needs to be most informed is the one running the trolling motor. MY SOLUTION: To provide maximum info for the trolling motor operator I installed dual transducers for the front sonar. One transducer is attached to the bottom of the trolling motor. The other is attached to the rear left corner of the boat (at the transom). These transducers are connected to an A-B switch (FIG. 10) that, in turn, connects to the sonar unit. The trolling motor person can instantly switch from one transducer to the other with a flip of the A-B switch (mounted near the sonar).
FIG.
10 — The A–B
Switch for the Dual Transducers to Front Sonar
Movable Rear Sonar. I hate having my sonar be hard to read due to sunlight. Or, be positioned where I can't easily view it while fishing. MY SOLUTION: I made the rear sonar movable. To do this I mounted the unit onto a small board and created an umbilical cord, so to speak, that extends to the unit. The umbilical cord contains three wires — power, transducer, speedo wires — encased within a six-foot piece of flexible protective sheathing (i.e., wire loom cover). This enables the rear sonar to be positioned virtually anywhere in the rear half of the boat, including on the middle bench seat, on the rear bench seat, and on the floor (FIG. 11). It works great!
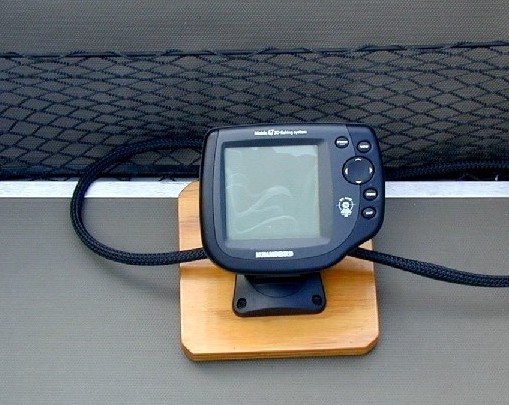
FIG. 11
— Rear Sonar on the Floor Sometimes Is the Most Convenient Viewing Position
While Fishing
Easy-access Rod Holders. A cluttered boat bugs me. But a boat with fishing rods laying around (and sticking up) all over, really irks me. Of course many boats have nice under-floor rod lockers. These are great for storing and locking up rods within the boat. But the guys I fish with seem to like having their rods at arms reach, for instant grabbing. MY SOLUTION: I installed easy-access rod holders (FIG. 12) on each side of the boat. Further, there are rod holders both forward and rearward. This rod holding system, while simple, works great. It positions rods out of the way, yet enables instant set-down and pick-up of a chosen rod no matter where you're seated in the boat. Up to a dozen rods can be held this way — six on each side of the boat. My fishing partners like it a lot.
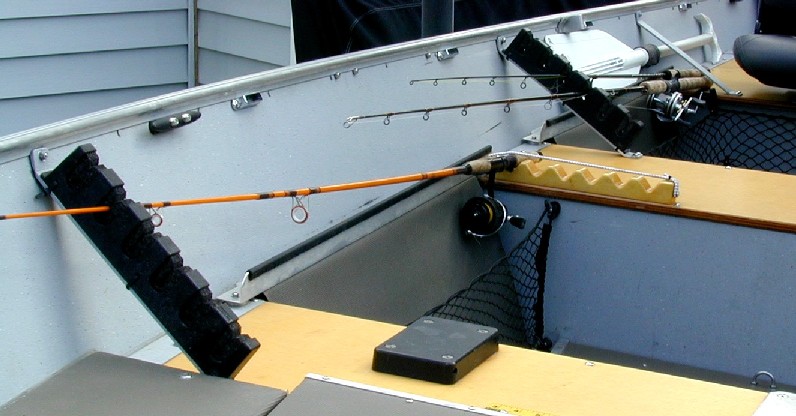
FIG.
12 — Easy-access
Rod Holders Front and Rear - (Up
to 6 rods can be held this way on each side of the boat)
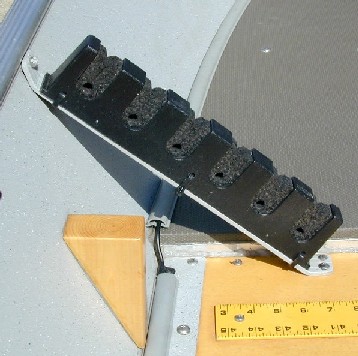
FIG. 12B
— Close-up of Rod Holder —
it's mounted on one of the boat's support braces
Vinyl Floor Covering. I debated for months over the floor covering: carpeting or vinyl? I finally decided to go with vinyl. The main reasons were (a) dries quicker; doesn't retain moisture that breeds mildew and mushrooms, (b) cleans easier, and (c) is more durable (carpeting fades and forms wear spots). Plus, if I changed my mind after installing vinyl I could easily switch to carpeting. Or, I could create removable carpet sections. But, once carpeting had been installed I couldn't easily switch to vinyl. However, I've always had one gripe about most boat vinyl: it's a bit cheesy-looking. Then I discovered a vinyl product called Deco Dot (FIG. 13). It looks great (in my opinion). Plus, it cleans easier than regular vinyl. Plus it appears to be more rugged, too.
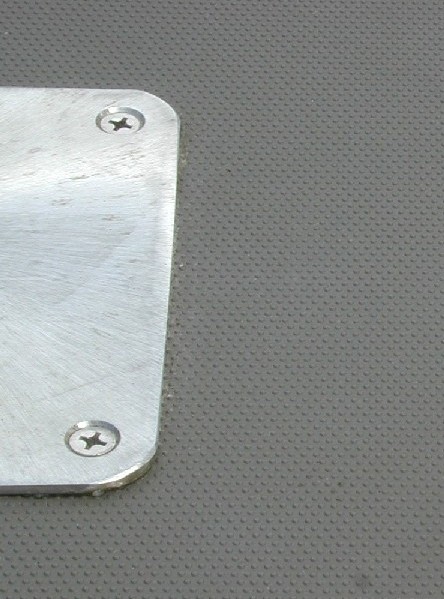
FIG.
13 — Deco
Dot Vinyl Used on Floor
Storage
& Placement Strategy
A guiding principle used in the design
and customizing process was: "A place for everything, and everything in its
place." The objective is to keep the floor of the boat open and free of clutter.
This, in turn, makes for easy, efficient, comfortable fishing. Here's some of
the key factors involved.
Tackle Storage. A common problem — even with large boats — is having to step over tackle bags and boxes strewn all over the floor. To overcome this problem I planned the boat's layout around the #3700 (or #370) plastic tackle tray. This is the large one that measures 14"x9"x2". Using this particular tray as the tackle storage platform, we can pack a huge amount of tackle in the boat while keeping the floor open and free. Here's how it's done.
FIRST, at the rear of the boat, in the space just in front of the splashwell, I installed a shelf for holding tackle trays (FIG. 14). Here, up to six #3700 (or #370) trays can be neatly stored out of the way yet be handy for quick access (FIG. 15). The trays can be positioned either horizontally or vertically — user's choice.
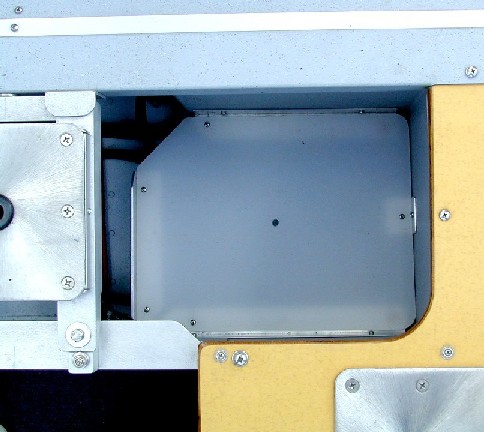
FIG.
14 — Rear
Tackle Tray Compartment
- (holds up to six #3700 tackle trays - either horizontal or vertical)
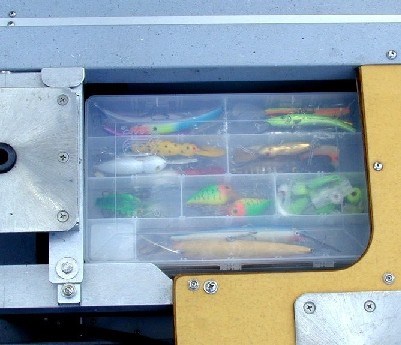
FIG.
15 — Rear
Tackle Tray Compartment Filled with 6 Trays
- (instead of being layed horizontal, trays could be positioned vertical, if so
desired)
SECOND, underneath the elevated middle seat (between the left and right middle bench seats) there's an open space. Here, up to eight #3700 (or #370) trays can be stored out of the way yet be handy for quick access (FIG. 16). Optionally, a third back-up fuel tank can be carried there instead, for a day of extra-long travel.
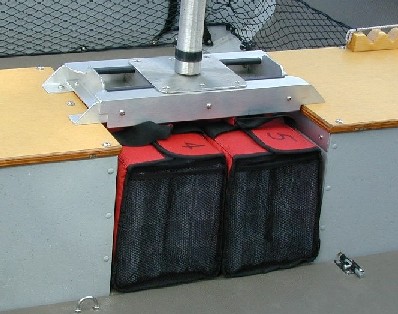
FIG.
16 — Open
Space Under Middle Seat Can Hold Up to Eight #3700 Tackle Trays
THIRD, along the sides of the boat are storage "compartments" created by flexible netting (previously discussed, FIG. 6). Each compartment can easily hold two or three #3700 (or #370) trays, positioned out of the way yet handy for quick access (FIG. 17). NOTE: While storing tackle trays in these side compartments is possible, we seldom have need to do it. Instead, these compartments tend to be used for storing such things as jackets, rolled maps, water bottles in use, and anything else that we desire to "put out of the way."
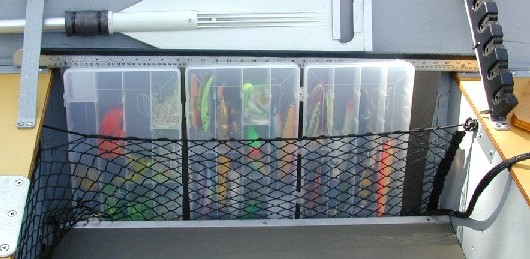
FIG.
17 — Side
Storage Compartment with Three #3700 Tackle Trays
In total, up to twenty five #3700 (or #370) tackle trays can be handily stored out of the way in various compartments around the boat. If further tackle storage is required, tackle trays can be stored in either of the two under-floor storage compartments or in the bow storage area.
Anchor & Safety Equipment Storage. I seldom use an anchor in my style of fishing. However, the U.S. and Canadian Coast Guards require an anchor, along with other safety equipment such as paddle(s), ropes, manual bilge pump, running lights, and other things. I store my paddles in a special spot along the sides of the boat for easy grabbing. Everything else is stored in the under-floor storage compartments.
Rainsuit Storage. Carrying rainsuits can consume a lot of space. Typically, I store them either in the large bow storage compartment or in one of the under-floor compartments. When storing them under the floor I put each suit into a small plastic trash bag, first.
Fish & Bait Storage. My boat has no livewell. That's because I practice catch-and-release (FIG. 18). The only time I keep fish is when I'll be eating them (which isn't that often). In this case, I take a cooler with ice and carry my catch on ice. It makes for better-eating fish. I also seldom use live bait, so I don't have a baitwell. If, however, I should ever decide that I needed one, I'd rig up any of the several portable options (sold at Bass Pro, Cabela's, and elsewhere). The same could be done to create a livewell. One called the Toho-Rig looks like it would be a “good fit” in this boat.

FIG.
18 — My Reminder
Slogan
Fuel Storage. I have two 6-gallon remote fuel tanks. These tanks tuck neatly under the left and right rear bench seats (FIG. 19). I get at least 25 miles per tank, or a total of 50 miles for both. When I need more distance than that (which isn't often), I take a third 6-gallon tank. I carry it in the open space under the elevated middle seat base (between the left and right middle bench seats).
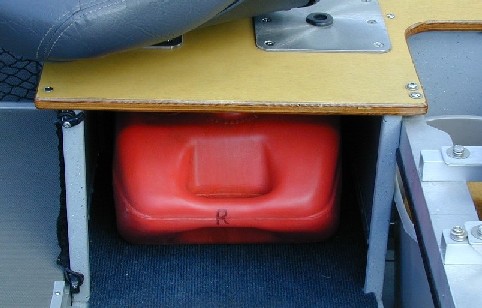
FIG.
19 — A 6-gallon
Fuel Tank Tucks Neatly Under Each of the Two Rear Bench Seats
Cooler Placement. I use a medium-size Igloo brand cooler (FIG. 20) for carrying my sandwiches and water. It happens to fit perfectly in the open space between the left and right rear bench seats.
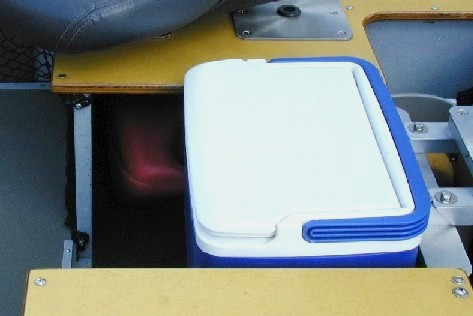
FIG.
20 — A Medium-size
Cooler Fits Neatly in the Space Between the Rear Bench Seats
Landing Net Placement. In addition to walleye and smallmouth bass fishing I also like catching pike. So I carry a fairly large landing net. However, where to carry a large net so that it's out of the way can be a problem. The Lund SSV-18 happens to have a large, full-width splashwell. My net fits nicely in the splashwell (FIG. 21). To make it fit I had to saw a few inches off the end of the handle. But it has an extendable handle with more length than I need, so there's no problem.
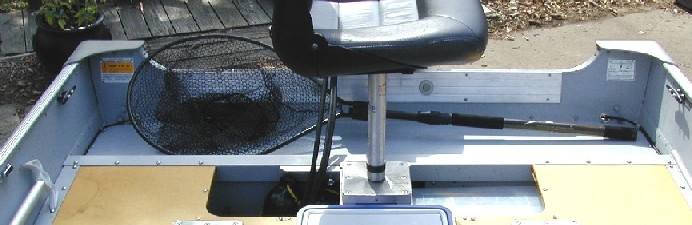
FIG.
21 — A Landing
Net Fits Nicely in the Splashwell
PFD Placement. The Coast Guard — plus common sense — mandates a personal flotation device (a.k.a. life jacket) for each person in the boat. Ideally, life jackets should be worn. However, they're not comfortable in hot weather. So, the next best thing is to carry them on the seat backs (FIG. 22). This makes them readily available for use. Plus, it frees up valuable storage space that the jackets would consume if stored. To use this tactic, however, one's boat seats must have a fairly high back. I installed the Tempress Navistyle Hi Back seat. One of the reasons I went with this seat is it's amenable to carrying a life jacket over the seat back.
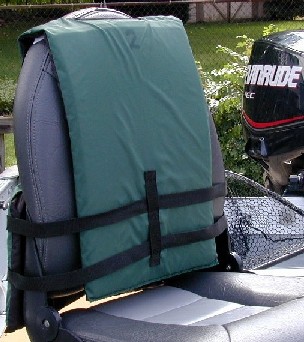
FIG.
22 — Carrying
Life Jackets on the Seat Backs Keeps Them Out of the Way But Handy
Spare Rods Placement. I hate hassling with spare fishing rods lying round (and sticking up) all over. To me, for a pleasant fishing experience rods must be stored down low and to the side. Plus, if each rod is secured in the middle or tip it prevents rattling and sliding around during travel. The previously discussed rod holder system (FIGS. 12, 12B) accomplishes all of this.
Other
Factors
Construction Materials. To make the floor and
bow deck I used 3/8-inch marine plywood. I went with 3/8-inch rather than 1/2-inch
for weight reduction. Under each seat base I double-plated with a back-up piece
of the 3/8-inch board. It works great. For the underlying support structure of
the floor I used extruded aluminum — mainly L-bar. I got this from my local
hardware store. For fasteners I went with stainless steel bolts and screws. For
nuts I used stainless nylocks. Virtually every metal item in the boat is either
aluminum or stainless. It's a bit expensive — but I hate rust. For floor
covering I went with Deco Dot vinyl (previously discussed, FIG. 13). Any
exposed wood, such as the underside of the floor boards, was sealed with several
coats of marine polyurethane.
Bilge Pumps. The boat has two bilge pumps: a manual pump (stored in an under-floor compartment) and a Rule electric pump that I installed at the transom.
Fire Extinguisher. Because the boat has enclosed storage areas I installed the required extinguisher.
Boat Color. The Lund catalog shows the SSV-18 in two color choices: red and tan (or “Fall Marsh”). However, at the time I ordered my boat it was possible for the dealer to special order it in other colors, as well. These included black, white, blue, and green. I chose green. It looks great.
Power
Choice
Several years ago I spent ample time fishing with a
50 horsepower tiller four-stroke. I liked it. After that experience I was 100
percent sold on four-stroke. I thought it was the end-all of outboard technology.
However, subsequent research changed my mind. I became a believer in DFI (direct
fuel injection) two-stroke technology. As it happens, Evinrude is the only major
outboard-maker that sells a 60 horsepower two-stroke motor in direct fuel injection.
So I purchased an Evinrude E-TEC 60. Two main factors drove the decision.
1) Greater convenience — No oil changes and no oil disposal required — Fewer scheduled maintenance sessions required — 2-minute self-winterizing.
2) Full horsepower — Actual horsepower of four-stroke motors has tended to be less than the stated horsepower, whereas actual horsepower of two-stroke motors tends to be at or above the stated horsepower.
Also, Evinrude provides an excellent fisherman-friendly tiller handle (FIG. 23). It's extra-long and it includes a thumb-controllable trim button at the end of the throttle grip, an easy-reach forward-positioned gear shift handle, and forward-positioned start and shut-off buttons. (In the spirit of candid disclosure, Yamaha also has a nicely-designed tiller handle; plus I see that Mercury is now coming out with one, too.)
(NOTE: If you seek more info on E-TEC features and technology I would suggest that you contact a knowledgeable dealer. The most knowledgeable person on this product that I've come across is Dave Zammitt of Lockeman's Hardware & Boats — Phone: 313-842-0268.)
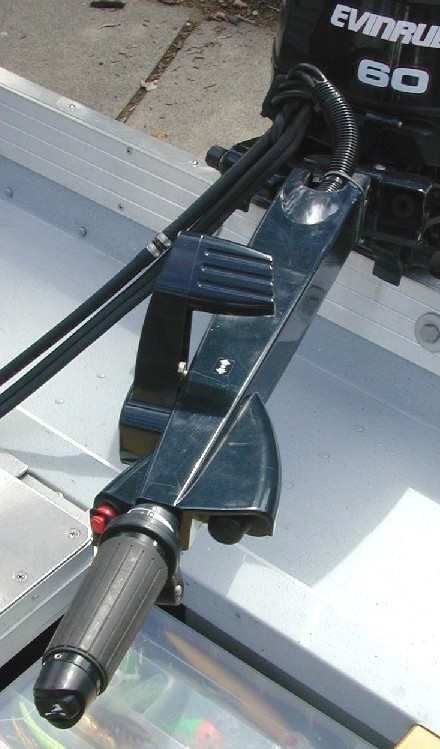
FIG.
23 — Extra-long
Fisherman-friendly Tiller Handle Puts All Controls Within Easy Reach
Close-ups
of the Finished Boat
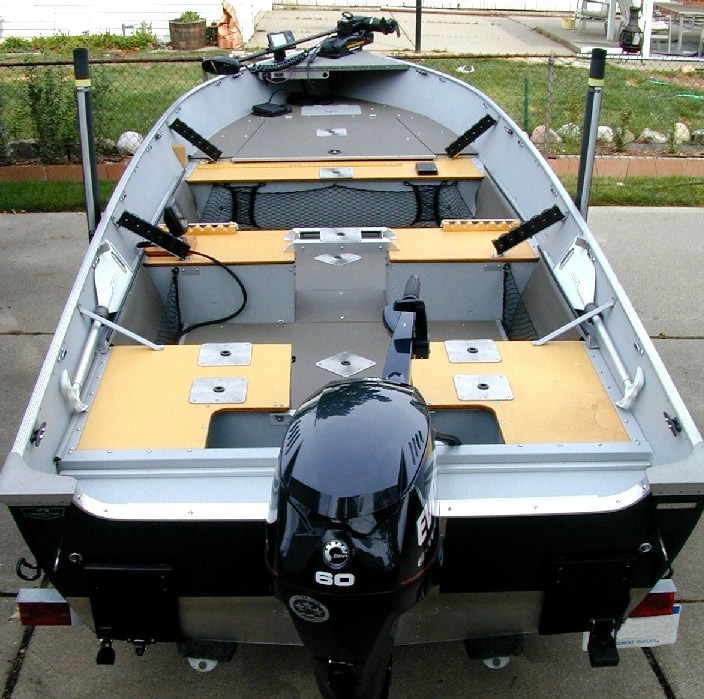
To
convey the big picture, here are photos of the finished boat in three sections
— front, middle, rear (FIGS. 24, 25, 26).
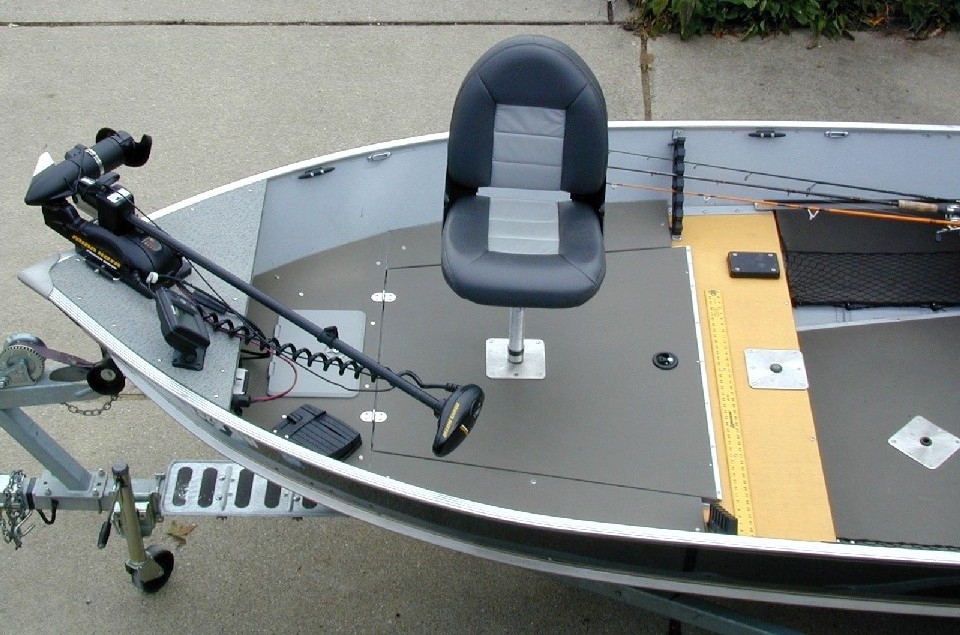
FIG.
24 — Front
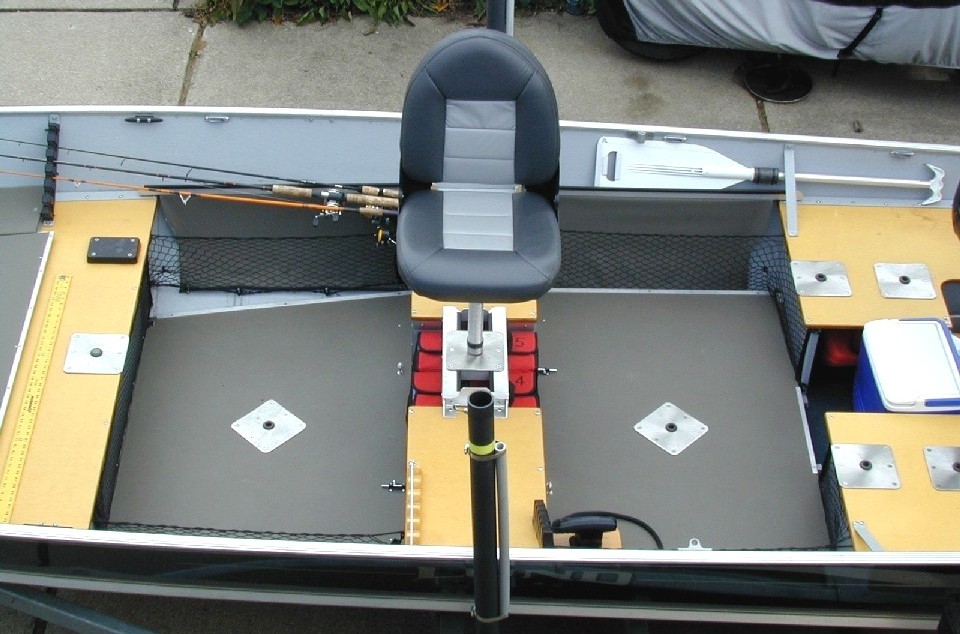
FIG.
25 — Middle
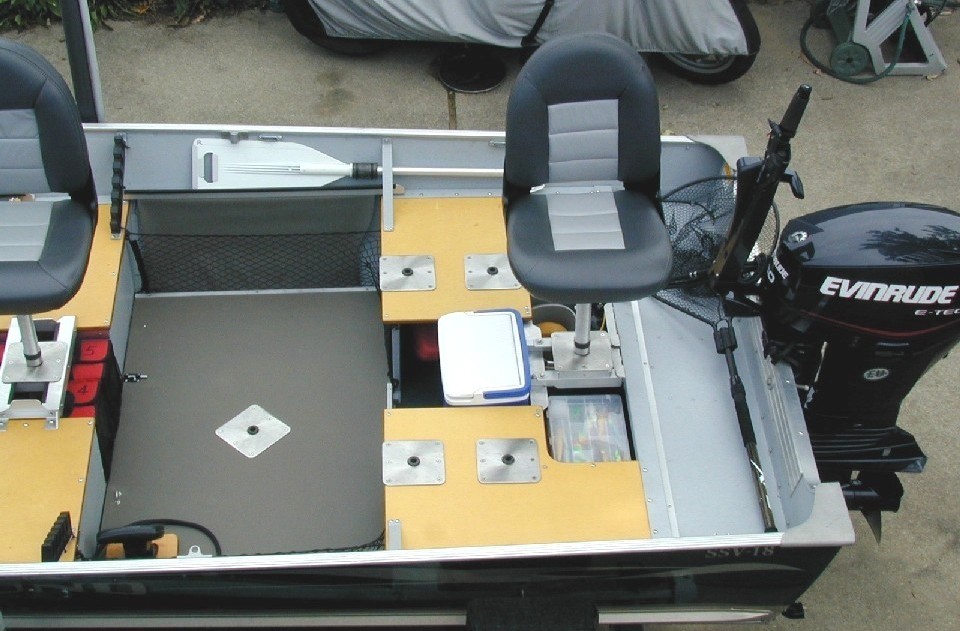
FIG. 26
— Rear
Specs
& Details
In case you're one who likes the nitty-gritty,
here are some details. Items with an asterisk (*) were installed after
the initial conversion.
Total Weight of Finished Rig (FIGS. 2, 3)— The entire rig — trailer, finished customized boat, motor, equipment, fuel — tips the scale at around 1800 pounds.
Basic Boat (FIG. 1) — Model: Lund SSV-18 — Length: 18'4" — Beam: 76" — Transom height: 20" — Weight (as purchased): 460 lbs — Weight capacity: 1500 lbs — Maximum horsepower rating: 60 hp (max hp rating for Canada is 50) — Construction type: Riveted aluminum — Bottom type: Shallow-V (about 4 degrees deadrise) — Fuel storage: Two remote 6-gallon tanks (purchased separately) — Steering: Tiller (optional side console steering available)
Trailer — EZ Loader, galvanized steel
Outboard Motor (FIGS. 2, 3, 9B, 23) — Model: Evinrude E-TEC 60 — Horsepower: 60 — Basic technology: DFI (direct fuel injection) two-stroke — Weight: 240 lbs — Steering: Tiller (remote steering available) — Cylinders: Inline 2-cylinder — Displacement: 53 cu. inches — Alternator: 75 amp, with 25 amp dedicated to battery charging — Starting: Electric — Trim: Power trim and tilt
Top Speed — Top speed for the customized fully-loaded boat with Evinrude E-TEC 60 ranges from 31 to 35 mph, dependent on number of persons in the boat.
Running Range — About 25 miles per 6-gallon tank of gas (with much of it at full-throttle).
Fuel Tanks (FIG. 19) — Model: Tempo Ultra6 — Capacity: 6.5 gal. — LxWxH: 21.12"x13.5"x9" including cap — Material: Plastic
Trolling Motor (FIG. 24) — Model: Minn Kota Powerdrive 70PD/AP — bow-mount, 24 volt, 70 lbs thrust, auto-pilot
Front Sonar (FIGS. 7, 24) — Model: Humminbird 727 — kilohertz frequencies: 83 and 200 kHz — connected to dual transducers via an A-B switch (FIG. 10); the front transducer being connected to the trolling motor, the rear transducer being attached to the transom (FIG. 9B)
Rear Sonar (FIGS. 7, 11) — Model: Humminbird Matrix 47 3D — kilohertz frequencies: 83 and 455 kHz — connected to a transducer on the transom (opposite corner to the transducer for the front sonar)
Starting Battery - 12 volt (FIG. 9) — Model: Cabela's Advance Angler AGM — Type: Absorbed glass mat — Size: 22 — Weight: 38.5 lbs — LxWxH: 9.37"x5.5"x9.25" — Marine cranking amps (MCA): 850 — Cold cranking amps (CCA): 670 — Reserve capacity (RC): 95 … NOTE: The dual sonars also run off this battery.
Two Trolling Motor Batteries - 12 volt (FIG. 9) — Model: Cabela's Advance Angler AGM — Type: Absorbed glass mat — Size: 24 — Weight: 53.5 lbs each — LxWxH: 10.87"x6.75"x9.87" — Marine cranking amps (MCA): 1195 — Cold cranking amps (CCA): 945 — Reserve capacity (RC): 178 ... NOTE: These absorbed glass mat batteries have performed well for me. Plus they have numerous advantages over lead-acid, including lighter weight, totally sealed and leak free, maintenance free, can be mounted in a non-upright position such as on its side, won't freeze so needn't be removed from my boat for the winter, charges fast, and doesn't undergo as much "damage" if deeply discharged or left uncharged. I'm sold on them.
Battery Charger (FIG. 9) — Model: ProSport 20 Plus — 20 amps, 3 banks (purchased from Bass Pro).
Seats (FIGS. 3, 22, 24–26) — Model: Tempress Navistyle Hi Back — Colors: Gray/Charcoal
Seating Hardware (FIG. 3B) — Type: Non-threaded Kingpin — Base: Springfield brand stainless steel 7"x7" non-threaded — Pedestals: Springfield aluminum 11", 13", and 15" non-threaded — Seat mount: Springfield stainless steel without spring. — The following afterthought notes have been added. NOTE 1: I don't use the spring-type seat mounts (any longer) because the spring chews up the plastic ring on the top of seat bases and pedestals (or, at least the Springfield brand does this). NOTE 2: In the course of using Springfield brand seating hardware, I've encountered a number of items that exhibited poor design and/or manufacturing quality control issues. As a result, if I were to do a project like this again, I wouldn't go with Springfield. After examining competing products, it appears to me that Swivl-eze (a division of Attwood Marine Products) makes a better-designed, higher-quality line of kingpin-style seating hardware. NOTE 3 (added 2013): In 2006 there were two types of kingpin base-plates available. One type had a hard plastic sleeve (which the kingpin fit into). The other type had a metal sleeve, instead of plastic. The plastic-sleeve type was cheaper. It seemed to me that it would perform as well as the metal-sleeve type, so I saved a few bucks and went with plastic. It was a mistake. Over time, the plastic sleeves became deformed, especially in the bases where I used the offset seat post (see description below). Once deformed, it made it hard to remove the seat post or seat itself from the seat base — requiring one to stuggle with it for a half minute or so. If I were to ever install kingpin seating in another boat I would definitely spend the extra money to get the metal sleeve seat-bases, especially if I intended to use offset seat posts.
*Offset Seat Post (FIG. 41) — Type: Springfield Non-threaded Kingpin, 13" tall with 5-inch offset (Swivl-Eze also makes an offset post, which has 4-inches of offset; probably either one can be purchased from Bass Pro or Cabela's)
Paddles (FIGS. 6, 7, 25) — Type: Lightweight paddle made of aluminum and plastic, with an extendable shaft (purchased from Bass Pro or Cabela's)
Stowage Rod Holders - Berkley option (FIGS. 12, 12B) — Model: Berkley Deluxe Rod Holder, horizontal style
*Stowage Rod Holders - Folbe option (FIGS. 38, 38B) — Model: Folbe SOF-LOC holders (purchased directly from www.folbe.com)
*Trolling Rod Holders & Accessories (FIGS. 29–34) — Model: Folbe Rod Holder; Side Mount; and accessories that fit into side mount (purchased directly from www.folbe.com)
Storage Nets (FIGS. 6, 17, 25) — Brand: BoatGo storage net — Comes in two lengths: 42" and 52" — why those lengths, I have no idea (purchased from Cabela's)
Floor Covering (FIG. 13) — Deco Dot vinyl, gray (purchased from Cabela's)
NOTE: My listing of the above brands is not meant to connote that these brands are necessarily the best brands or the only suitable brands. They simply appeared to best suit my personal purposes at the time I was selecting equipment. Others folks may have purposes different from mine, for which other brands and different equipment may be better suited.
Hindsight
Comment
I wrote this article to pass on ideas for how a walleye
boat might be improved. I did not write it to suggest that anyone should tackle
a complete customization project like this. The amount of time required to do
this was about triple what I initially projected. I invested at least six weeks
of time. There's more to it than meets the eye, and it's more time-consuming than
you might imagine. I pursued it as a labor of love — a hobby-type pursuit.
In that context, it turned out to be rewarding and worthwhile. Had I viewed it
as a “quick and easy way to make a walleye boat,” I would have been
disappointed.
Further
Info
If you have a question not answered in this article, or want info pertaining
to dealer experiences, you may feel free to contact John Correll: To
Email.
Special
Thanks
I
extend special thanks to my brother Tom Correll who inspired me to undertake this
project and indirectly contributed to its success. In 2002, Tom endeavored to
build a walleye boat from scratch — a prodigious undertaking. I worked with
him in the planning phase of the project, at which time we had numerous brainstorming
discussions. Many of the innovative concepts that we came up with in those discussions
have been incorporated into the "walleye dream boat" described herein.
In addition, I thank Dave Zammitt, who provided me with assistance and expert
answers to my many technical questions on boat rigging and set-up.
Shortly after this article was first published in 2007, questions and comments began to surface. Here are nine of the most common ones — along with my answers.
1 - Do I have drawings of the conversion that I can provide? Sadly, I don't. I created initial drawings. But, as I progressed I often saw a better way to do something. When I did I deviated from the drawings. I never modified the drawings to reflect the changes.
NOTE: I've given thought to creating a set of "Lund SSV-18 Conversion Drawings" and selling them in book form for about $50/book. Doing such would require considerable time. However, I haven't yet been able to convince myself that I'd sell more than a dozen copies. So I haven't bothered to invest the time to create and publish the book. If you'd like to send me your thoughts or feedback on this idea, you may feel free to email me:Click Here.
2 - How has
the Deco Dot floor covering turned out?
The Deco Dot vinyl floor covering
has worked well. No problems so far. I have no recollection of it ever being slippery
when wet. It cleans up easily. It seems to be durable.
3
- The boat has no livewell and no baitwell.
Due
to my style of fishing, I have no use for a livewell. For me it's a useless fixture
that takes up valuable space. The only time I keep fish is when I'm going to eat
them (which isn't that often). And, the best way to store fish for eating is a
cooler with ice or ice-packs. However, if I were a fisherman that regularly used
a livewell, I probably would purchase the Toho-Rig livewell/baitwell (from baitwells.com
or basspro.com). OR, I would simply buy a boat with a built-in livewell. Instead
of the Lund SSV-18, I most likely would have gotten a Lund 1800 Alaskan and then
modified it to have bow storage and similar seating placement to what's in the
above-shown SSV-18.
In case you're interested, here's what the Toho-Rig livewell looks like (FIGS. 27, 28). If I had one, I'd position it on the floor in the forward (or middle) floor section, just rearward of the bench seat that forms the rear edge of the elevated bow section. Of course, with this Toho-Rig livewell sitting on the boat floor, the storage compartment underneath that floor section would be inaccessible during that time.
FIG. 27
— Toho-Rig Portable Livewell
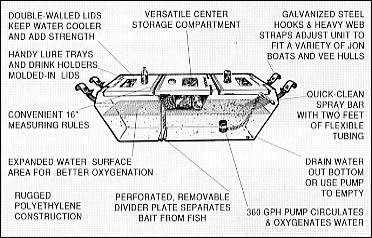
FIG. 28
— Toho-Rig Livewell spec drawing
(www.baitwells.com)
As regards live bait, I don't use it much any more. I've used thousands of minnows and night crawlers over the years. But for some reason I drifted away from them and now use artificials. If the time comes that I have need for a baitwell, I'll purchase one of the several portable models, or the above-shown Toho-Rig.
4 - The boat has no trolling rod holders. It's correct that the initial boat had no holders for trolling rods. However, this deficiency has been remedied. See Part 3 (after this Part 2).
5 - With all those elevated fishing seats in the boat, it looks tippy. Well, in this case, looks are deceiving. I've never had a situation where the boat felt or acted tippy, even with four persons fishing in elevated seats. There are two reasons for this. First, everyone's sitting on the centerline of the boat. Second, the boat has a seaworthy hull design. It's a shallow-V, or round bottom, boat. Even though its beam is only 76 inches, I've never had it feel tippy. (Of course, it goes without saying that any time you travel faster than trolling speed, or over 5 mph, no on should be sitting in an elevated seat — it's the law.)
6 - The boat doesn't have a deep-V hull. For some reason, many persons today feel that in order to have a "serious" fishing boat it must have a deep-V hull. I politely disagree. Yes, a deep-V hull has a couple benefits. First, it cuts more smoothly through big waves at high speed. Second, it tends to produce less spray in choppy water. However, what these same persons often don't realize is, a shallow-V boat also has some distinct benefits. First, it gets up on plane more easily than a deep-V boat, especially when loaded down. Second, it can get up on plane with a smaller motor than is required for a deep-V boat. Third, it gets better gas mileage than a deep-V boat. Fourth, it can run at the same speed with a smaller motor than is required for a deep-V boat (or, with the same size motor, it will run at a faster speed). Fifth, because it can get by with a smaller motor than a deep-V boat, it has less weight strapped to the transom (sometimes a savings of over a hundred pounds). Sixth, because it doesn't require as big a motor, it saves the boat owner several thousand dollars in boat investment cost. Seventh, the outboard shaft-length required for the shallow-V hull is less than that of the deep-V and, as a result, sometimes the shallow-V can get by with a shorter-shaft outboard than the deep-V boat (like, say, a 20-inch shaft instead of a 25-inch shaft). Eighth, the shallow-V boat has a shallower draft than the deep-V boat and, therefore, will float in shallower water. Ninth, a shallow-V hull has better stability, or less tippiness, than a deep-V hull. Indeed, when it comes to deep-V versus shallow-V hull, the jury is still out.
7 - The boat is so pretty and fancy you could never actually fish with it … you couldn't bring a fish into the boat because you couldn't get fish slime off the floor … and so on. Since I first posted this web page in 2007 I've noticed an interesting response pattern. Whenever someone mentions this page on a fishing (boat) blog it generates a hundred or so page visits. This results in follow-up responses on the blog. I've noticed that these responses occur in a predictable pattern. First come some complimentary responses. Then, following that, come a number of critical responses (the most common one being #8 below). Some of these responses are so far-fetched they have me scratching my head. One of them pertains to the boat being “unusable,” or so fancy you could never use it or get it dirty. In case you happen to be one who has come to this conclusion, please allow me to dispel it by pointing out that the boat has pretty much experienced it all, including: (a) pike slime … plus whatever slime sometimes comes from wallies, smallies, largemouth bass, white bass, musky, salmon, carp, drum, catfish, and other species, (b) fish feces, (c) fish semen sprayed all over, (d) fish blood spead all over, (e) sea gull whitewash of ample amount, (f) mud from muddy boot bottoms, (g) total dust layer from towing the boat down 20 miles of dry dirt road, and (h) total mud layer from towing the boat down 20 miles of wet dirt road.
8 - You could have bought a new boat for as much as you spent on the conversion, or maybe even less. This is the most common critical comment I've heard. The sister comment to this one is: "You could've bought a boat and saved all that work." Both these comments, of course, are correct. I was fully aware of these two realities from the get-go. But these criticisms miss the point of this project. I didn't want just "a boat." I didn't even want "a nice boat." Boats — and nice boats — are everywhere. What I wanted was a very specific type of boat — a boat that would meet certain exact requirements (described in the "Basic Boat Features" section at the front of this article). No boat manufacturer made the type of boat that I wanted. It didn't exist. I also wanted the satisfaction of creating and having my own unique boat. In light of these goals, the project was a success. The finished boat met every criteria that I set for it, and its fishing performance surpassed my expectations (which were quite high). To sum up, the project has been rewarding and I'm glad I did it.
9 - How much did the entire project end up costing? Here's the cost breakdown of the total rig. Bear in mind, this is 2006 dollars.
|
$ | Item |
| $4250
| Lund SSV-18 boat |
| 450
| Lund boat cover |
| 200
| Cover support bows & hardware |
| 1800
| EZ Loader trailer |
| 7500
| Evinrude E-TEC 60 hp with tiller handle |
| 370
| Three Cabela's AGM 12v batteries |
| 160
| Pro Sport 20-plus battery charger |
| 800
| Minn Kota Powerdrive trolling motor |
| 800
| Two Humminbird sonars |
| 60
| Two 6-gallon fuel tanks |
| 500
| Four Tempress seats |
| 300
| 10 stainless seat bases |
| 100
| Four 13" seat pedestals |
| 150
| Four stainless seat mounts |
| 150
| Two 3/8" sheets marine plywood (4'x8') |
|
120
| Deco Dot vinyl for floor (5 running yards) |
|
1500
| Hardware: extruded aluminum; stainless steel nuts, bolts, etc. (high estimate) |
| 225
| Five nets for side storage |
| 45
| Portable running lights |
| 45
| Hatch cover |
| 50
| Rule bilge pump |
| 500
| Whatever else I bought but couldn't recall for this list |
|
$20,075
| TOTAL |
Subsquent to the initial conversion in 2006 (and the publication of Part 1 in 2007), I've made a number of small additions and enhancements. Following are some of the more interesting ones.
Trolling
Rod Holders
Shortly after completing the initial conversion
I realized that I had left something out: rod holders for holding trolling rods.
I searched the Internet and reviewed blog discussions to find the "best make."
What I found was that nearly every brand has numerous avid fans. I also found
that each has its pros and cons. However, after reviewing websites it appeared
to me that Folbe had the most features that were important to me. So, I called
and chatted with one of the owners. He was friendly, knowledgeable, and helpful.
I asked him which of his competitors he would recommend if I didn't go with Folbe.
To my surprise, he cited two competitors, and stated that in his opinion each
makes a quality product. (For what it's worth, as best I recall, he also said
that Folbe's rod holder mounts will accept Ram, Fish-on, and Attwood rod holders,
as well, but would not accept Scotty.)
Compared to its competitors, Folbe rod holders are a bit pricey. However, there are two things about Folbe that won me over: (1) it offers a number of accessory products that fit their rod holder mount and (2) it appears to be committed to top quality. If you'd like to check out the Folbe product line, or get prices, go to www.folbe.com. NOTE: In hindsight, the Folbe rod holders worked well enough for me, but I think there are other brands that would work well, too. So, I'd suggest to anyone who is considering installing trolling rod holders to take a look at Folbe, but also look at competing products, as well, before making a final decision.
Folbe offers a variety of mount styles for their rod holder. I went with the Side Mount (Folbe calls it "Advantage Side Mount"), shown in FIGS. 29–37. I installed six mounts along each side of the boat — spaced about 30 inches apart (FIG. 29). This puts at least two rod holder mounts within easy reach no matter where you're sitting. For the side mount to work on my boat, I had to space it out at least 3/8-inch from the side of the boat. To do this, I bought a 3/8-inch thick plastic cutting board from a store with a kitchenwares department. I cut appropriate-size blocks from the cutting board with my jig saw and put a block underneath each mount, as can be seen in FIG. 30.
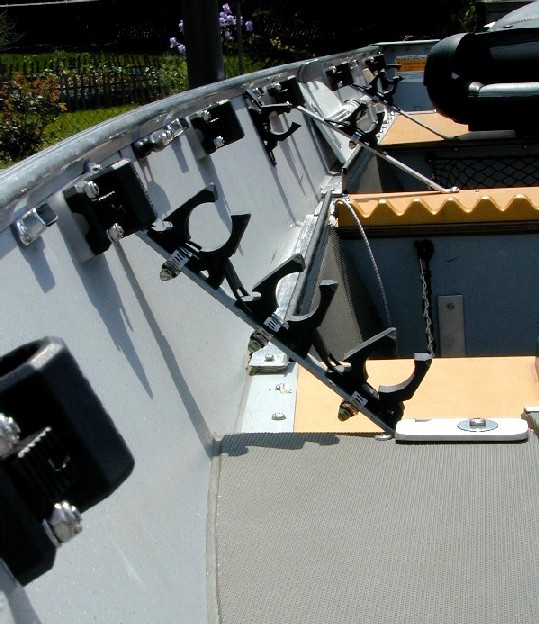
FIG. 29
— Six Side Mounts per side — spaced about 30-inches apart
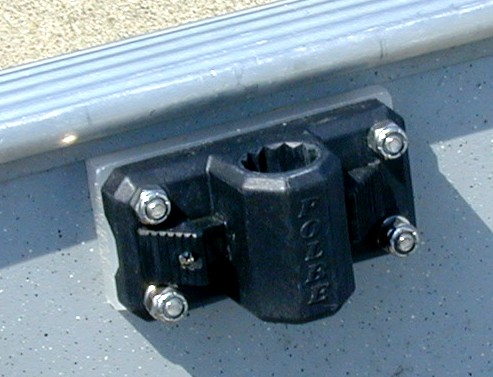
FIG. 30
— Side Mount — attached to the side of the boat with four bolts,
with a plastic spacer block between the mount and side of boat
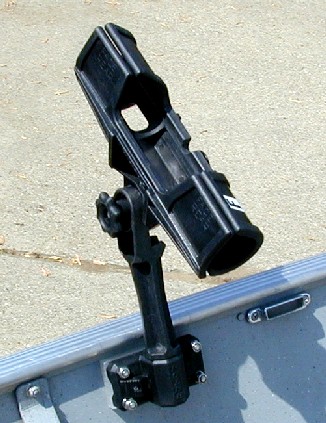
FIG. 31
— Folbe Rod Holder on a 6-inch extension post
In addition to accepting a rod holder, the side mount can be used a number of other ways. Some examples are shown below (FIGS. 32–37). In effect, it gives you an interchangeable "accessory-holding system" — limited only by your imagination.
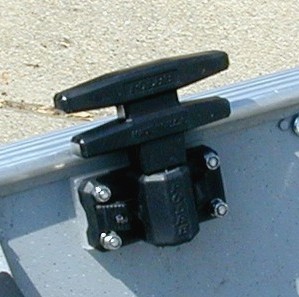
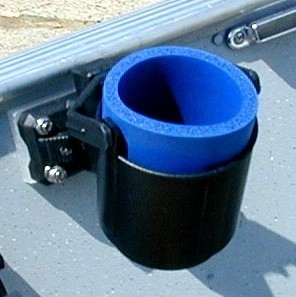
FIG. 32
— Side Mount with Folbe T-cleat
FIG.
33 — Mount
with Folbe Drink Holder
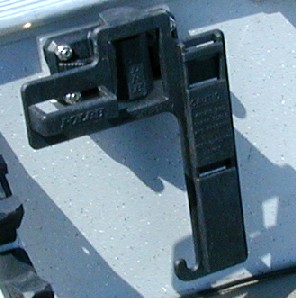
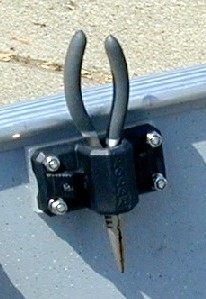
FIG. 34
— Mount with Folbe Tool Holder FIG.
35 —
Mount with Pliers
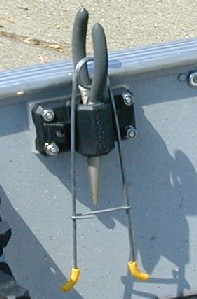
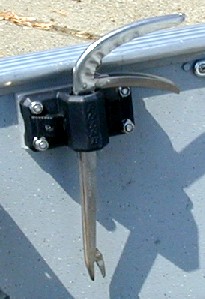
FIG. 36
— Pliers, Jaw Spreader FIG.
37 — Hook
Remover
NOTES: The handy T-cleat (FIG. 32) provides flexibility for tie-up and side bumper placement. The drink holder (FIG. 33) works well with 12-oz. cans. However, taller 16 oz. bottles will cause the holder to tip over. The tool holder (FIG. 34) is a nifty device especially if you want to have a knife in handy reach. However, if you don't use a knife, the side mount can be used as a holder in itself, as shown in FIGS. 35–37.
Different
Stowage Rod Holders
While reviewing the Folbe product line,
I noticed that they have a number of other products for holding items such as
nets, gaffs, poles, and paddles. One of these products they call the "SOF-LOC"
holder. It looked like it could be used for holding stowed fishing rods. So, I
purchased some units and installed them in place of the original Berkley Deluxe
rod holders (FIGS. 12, 12B). Here's what the Folbe SOF-LOC holders look
like.
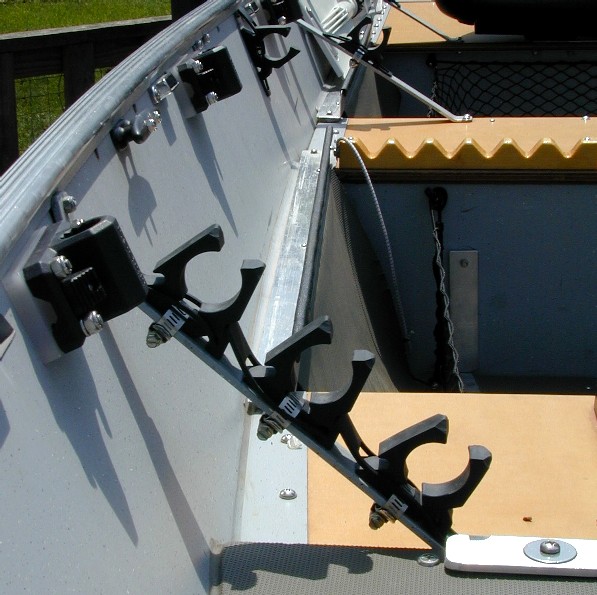
FIG. 38 —
Three Folbe SOF-LOC Holders
(mounted
on one of the boat's support braces - I use these holders for carrying stowed
fishing rods)
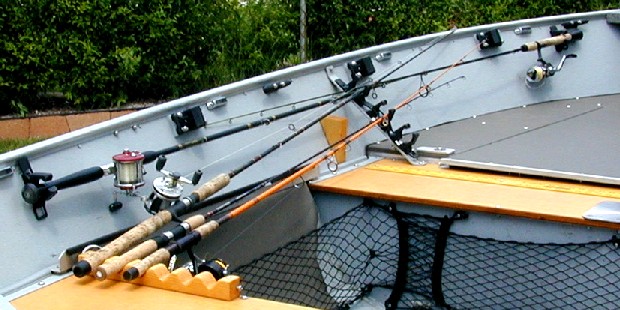
FIG. 38B —
SOF-LOC holders with Five Fishing Rods
FIG. 38B shows five rods stowed. Also, a couple more rods can be stowed in more holders further rearward (out of the photo), for a total of at least seven rods per side, or a 14 rods per boat, stowed out of the way.
At this point you must be wondering: Which rod-holding system works best — the Berkley Deluxe rod holders (FIG. 12) or the Folbe SOF-LOC holder (FIG. 38)? Answer: It's a toss-up. Each has its pros and cons. I installed the SOF-LOCs because I was curious to see how they would work. My conclusion: Both systems work well. I could recommend either of them.
Fourth
Elevated Seat
Shortly after I began using the boat, I discovered that virtually everyone
enjoys fishing from an elevated seat. So, I installed another seat base on the
floor. The purpose of this base is to provide a fourth elevated seat in a position
that allows for "elbow room" when four persons are fishing. To create
an elevated seat at this position, I need a seat post about 22-inches long.
Such posts are on the market. They're an adjustable post that can be set from
21 to 29 inches in height. However, I discovered that it's easier and cheaper
to just connect two 11-inch posts together (I already have these posts). With
this, I now have a fourth elevated seat (FIGS. 39, 40). However, at this
height only a person's toes touch the floor — which is a bit uncomfortable.
To solve this problem I purchased a tackle box that's 10-inches high. This provides
a comfortable foot rest for anyone using the fourth elevated seat. I know this
solution appears contrived. But, it actually works.
Of course, to take four persons, one must take into account the weight of those persons. The boat's rated capacity (Maximum Persons/Motor/Gear Weight) is 1500lb. The conversion adds several hundred pounds. So, four non-overweight adults would likely not exceed the boat's rated maximum capacity. (I'm 6' tall, 170 pounds.) However, four "overweighters" probably would result in exceeding the boat's rated capacity.
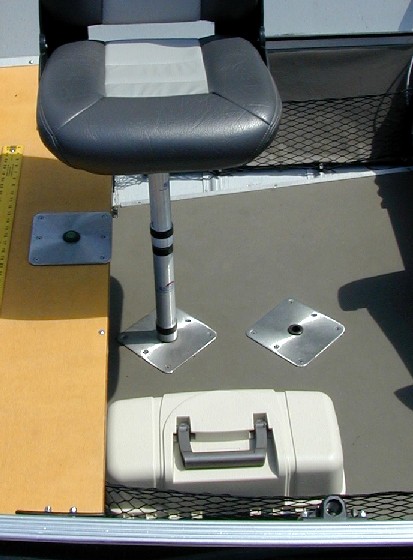
FIG. 39
— Fourth Elevated Fishing Seat
(created
by combining two 11-inch posts and a 10-inch high tackle box for footrest)
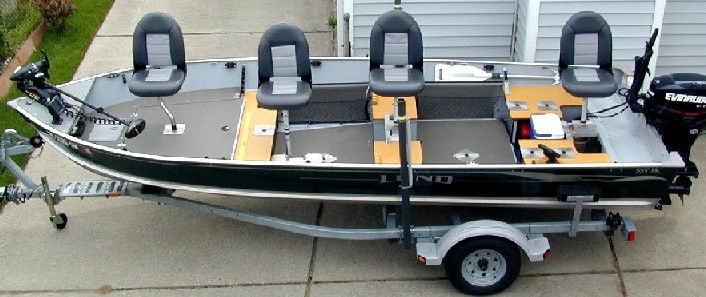
FIG. 40 —
Four Elevated Fishing Seats, all positioned on the boat's centerline
(and, no,
regardless of how it looks, this doesn't result in a "tippy boat")
Offset
Seat Posts
As you know from Part 1, I'm a fan of centerline
seating. It offers many advantages. However, there's one small disadvantage. When
everyone's facing the same direction, such as everyone facing a shoreline, it
causes the boat to list slightly in the direction everyone is facing. This results
because the weight of people's legs are off-center.
However, I discovered an easy fix for this problem: the offset seat post (FIG. 41). Depending on the brand, an offset seat post is either 4-inches or 5-inches off set. To correct the small listing problem it only takes one person in the boat to be using the offset post. This person positions their seat so that it's offset on the opposite side of the list. This makes the boat sit level in the water.
Another advantage of an offset seat post is that it gives an extra four or five inches of legroom between the person and the side of the boat. The bow person, who runs the trolling motor via foot pedal, often finds this handy. (Both Springfield and Swivl-Eze make offset posts. I believe both Bass Pro and Cabela's carry it.)

FIG. 41
— Offset Seat Post —
makes it easy to balance the boat and also
gives extra leg room in the bow
Swivel-restraint
for Outboard
Due to an outboard motor's torque, the motor tends
to turn counterclockwise (viewed from the top). As a result, anytime the driver
removes his hand from the tiller handle, the motor begins to pivot. This pivot
instantly causes the boat to turn right and veer off course.
This feature is especially irksome when trolling. Whenever the driver must get up to do something for a few seconds, the boat immediately turns off course. To fix this problem, motor manufacturers install some sort of "anti-pivoting" mechanism on their tiller motors. However, I've yet to find one that works well on a sustained basis. They always seem to be loosening up, or tightening down, or otherwise malfunctioning.
In an attempt to overcome this problem, I installed a simple "anti-swivel device." I purchased some 3/16-inch shock cord (a.k.a. bungee cord) and rigged it to extend from the tiller handle to a cleat, as shown in FIG. 42. Now, when I release the tiller handle while trolling, the boat stays on course. But, any time I need to make an instant right turn I can do so because the cord is stretchable. Shock cord can be purchased from most boat dealers and also from West Marine (www.westmarine.com).
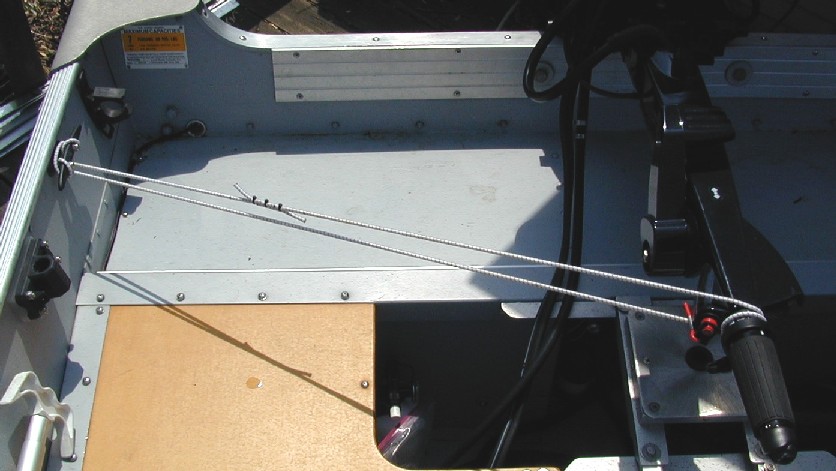
FIG. 42
— 3/16-inch Bungee Cord can make an effective "anti-swivel device".
Dual-anchor
Setup
My fishing partners and I virtually never use an anchor.
However, for the obvious reasons I have one on the boat. I gave some thought to
which style of anchor would work best for me. I finally settled on the mushroom
anchor because it's the easiest to store and handle. Then, the idea of a "dual-anchor
setup" occurred to me. I rigged it so either one anchor or two anchors could
be attached to an anchor rope — one anchor for light-wind days, two anchors
for heavy-wind days (FIG. 43). This also enables having one anchor at each
end of the boat, for when it's important to hold the boat exactly on a spot for
an extended period. (Yes, I have a second rope for that.)
FIG. 43
— Handy Dual-anchor Setup — 8 lb. each
(an
anchor can be unsnapped and also attached to a second anchor rope, if desired)
Fish
Counters
My main fishing partners are my brothers. For the
fun of it, over the years we got into the habit of counting the number of fish
we ("the boat") collectively catch in a day, or in a multi-day trip.
However, after a dozen or so fish the count always started to get blurred and
somewhat inaccurate. (Of course, when did exact accuracy become important to fishermen?)
So, one day my son suggested the obvious: Get a counter. I recalled that I had
a couple sitting in a dusty box for the past 30 years. I put them on the boat.
They work well — they add an extra fun dimension to the fishing.
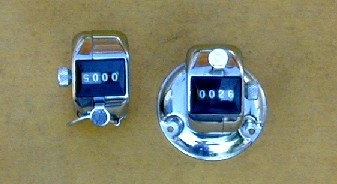
FIG. 44
— Fish Counters — one will fit into a pocket; the other on a flat surface
Foam
Padding in the Underfloor Storage Compartments
In the initial
conversion I installed cut-down clear plastic tubs, or "trays", into
the underfloor storage compartments (look closely at FIGS. 5, 5B). This
kept items from sitting directly on the aluminum boat bottom. Which, in turn,
reduced rattling and metal-on-metal abrasion.
However, these trays were a less-than-perfect solution. In sawing the tub sides down to the proper height it always resulted in cracks in the sides. Plus, the trays were a hassle to remove for cleaning the bilge area. Plus, they never fully eliminated rattling.
Then, last year, I found the perfect solution while walking through a store — foam floor pads. These pads are 2' x 2' x 1/2" thick. They have "tongue-and-groove" edges for possible interlocking. And, most important of all, they're made of tough, dense closed-cell foam. Because the foam is closed-cell it doesn't absorb water (very important).
The pads came packaged two ways: solid gray (for a work area) and multi-colors (for a kid's playroom). My first preference was gray. But the store was out of it. So I bought a couple packs of the multi-color, which was a mix of red, yellow, blue, and green. At first I was reluctant to get the colors. Then I realized that it would make it easier to "reassemble or match up" the pads after taking them out for cleaning. So I installed red and yellow in one storage compartment (FIG. 45) and blue and green in the other.
I also used the tongue-and-groove edge, but not the way it's intended. Instead of using it to lock adjacent pads together, I used it to create an air gap between the pads. This provides ventilation in the bilge area (where rain water collects). Which, in turn, allows the water to evaporate and the storage area to quickly dry out after a rain. To further facilitate quick water evaporation, I glued "elevation strips" onto the underside of the pads (FIG. 46). These strips elevate the pad 1/2-inch above the boat bottom, thereby allowing air flow underneath the pad. I affixed the elevation strips to the pad with silicone caulk (or adhesive). Also, as you'll note, I screwed pad pieces to the "end walls" of the storage compartment, to further prevent anything from rattling against the aluminum.
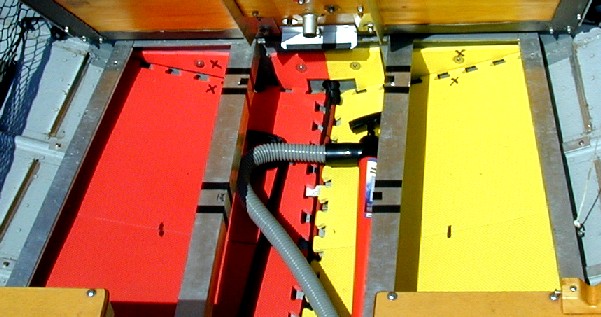
FIG. 45
— Foam Pads in an Underfloor Storage Compartment
FIG. 46
— Underside of a Pad, showing Elevation Strips for air flow
(the aluminum
ribs on the boat bottom also provide elevation support for the pad)
New
Stronger Bows for the Cover
One of the initial hassles I had
with the boat was the cover. I purchased a custom canvas cover from Lund. Then
I installed bow holders and bows to support the cover. That's when troubles started.
To begin, I bought some inexpensive wooden cover bows — the type that come in two pieces with a connecting device (or "clip") holding them together. Big mistake — a total waste of money. Then I fabricated my own aluminum bows from 1-1/2" wide x 1/8" thick aluminum bars. It appeared they would work great. But on the first trip I discovered they were way too weak. Downdraft-type wind from passing semi trucks caused them to buckle, or go concave. So, I reinforced each bow by bolting on an additional piece of 1/8" thick aluminum bar. Still didn't work. Downdraft wind from semi trucks and also snow accumulation in winter would buckle them. And, in so doing, ripped the cover and broke the bow holders. I repaired the rips and replaced the broken bow holders. Then, I set out to find some bows that would truly work. Eventually, I found it — 1-1/2" wide x 1/4" thick aluminum bar (shown in FIG. 47). The key dimension here is the 1/4-inch thickness of the bar. No longer do I have bow buckling from semi truck downdraft or snow accumulation. I wish I'd known to get them from the get-go. It would have saved me much time, money, and frustration. I got them from my local hardware store. One-quarter inch aluminum bar is a pricey solution for boat cover support bows — but it works well.
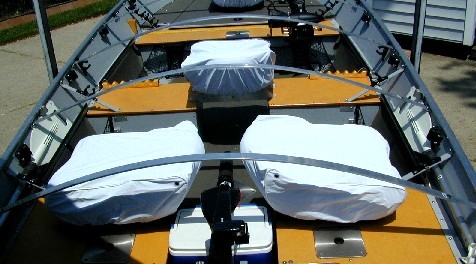
FIG. 47
— Cover Support Bows —
1-1/2 inches wide by 1/4-inch thick aluminum
bars resist buckling from snow
To hear a favorite song of mine, Click Here.
Each season brings its
own magic and meaning …
and heightens our appreciation and pleasure
of the opposing season to come.
Perhaps, in the end, it's about balance.
Reprinted with permission of
The Detroit News.
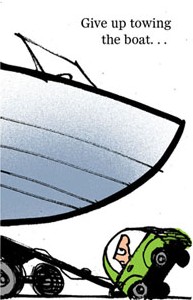
A May 2009 cartoon response
to a White House announcement
that by 2016 the average miles per gallon requirement
will be 35.5 mpg
(39 mpg being mandated for cars, 30 mpg for light trucks)
I'm now — as of this writing — 65 years of age. For as long as I can remember, the "bigger boat" has fascinated me. It was the boat that was a little bit longer than the one we might have, and had the new biggest outboard motor hanging on the transom.
I remember in the mid-1950s when the first V-4 Johnson/Evinrude came out. I was entranced by it — a whopping four cylinders in V-formation, cranking out an incredible fifty horsepower. And, I recall at around that same time the magnificent-looking inline 6-cylinder "tower of power" Mercs that generated an unbelievable sixty and seventy horsepower. Seeing a boat with one of these beast motors "screaming" across a lake at, say, 35 miles per hour was awe-inspiring to me. And, seeing two of these motors hanging from the same transom — now that was of another world.
Even though I'm not in the market for a new boat, and may never buy another boat, I still find boat shows interesting. I visit two or three every winter. And, as always, the new and bigger models pull me to them like a magnet. And, the new biggest, baddest outboard motors always require me to give them a close inspection, even though I'll likely never run one.
I'm also a subscriber to Bass & Walleye Boat, or BWB, magazine (which is about 80 percent bass and 20 percent walleye). Whenever the newest issue comes, I sit down and thumb through it page by page, advertisements and all. I've never owned a bass boat and likely never will. But, these boats intrigue me, nonetheless. The sleek flowing lines, the glittering multi-color deep-gloss fiberglass, the cockpit-style seating, the gauge-loaded console, the radius-corner water-tight storage compartments, the giant (now 300 hp) outboard bolted to the transom, and the capability to race at 80-plus miles per hour in a fishing boat — all this still piques my imagination.
But … not the way it used to. For some reason, about ten years ago I began looking at boats a different way.
In the past, I viewed boats in the context of maximization. I was intrigued by the boat that was bigger, faster, more powerful than what came before — that stretched the limit to a new extreme.
Today, however, I view boats in the context of optimization. I'm intrigued by the boat that does more with less — that is, the boat concept that offers "more boat" for less investment (or the same investment); more miles for less gas; more (or the same) speed from a smaller, lighter engine; more fishability from the same (or less) space; fewer problems; less maintenance; adaptability to multiple fishing styles; and easier to tow (that is, towable with a medium-size vehicle as opposed to a full-size, high-horsepower truck or SUV). Because of this, when I now go to boat shows, I'm looking for and drawn to these types of boats. Sadly, however, most manufacturers don't make a basic boat beyond a 16-foot length, which is what I'm most interested in seeing. And, oddly, the few manufacturers that make "basic" fishing boats in the 18–22 foot range for some reason tend to not take them to boat shows.
So, to conclude , I came to realize that there's two standards in designing/selecting a fishing boat. One is maximization. The other is optimization. The former involves achieving the most in size, speed, and power. The latter involves achieving the most in efficiency, ease, convenience, and versatility. In short, the former involves designing for the extreme. The latter involves designing for balance.
Each has its place. Each, in its own way, can be an object of beauty.
The boat depicted in this article, and the conversion process used to create it, resulted from my desire to create an optimal fishing boat — that is, a boat that, as much as possible, perfectly-equated with my personal values, lifestyle, and fishing priorities.
That's how — and why — that boat and this article came about.
Good Luck and Tight Lines.